What is a WordPress child theme?
A WordPress child theme is simply a theme that inherits all the code from another theme, known as the parent theme. When you have a child theme activated as your website theme, WordPress uses all the code from the parent theme, but code applied to your child theme specifically will override the code from the parent theme.
Why create a child theme?
If you want to change the design of your website without editing your existing theme files, you’ll need to create a child theme. Using a child theme means you can safely add new styling to your website without overwriting any of the original files.
Also, if you are using a custom WordPress theme, you might have already made your own customizations to the theme (such as modifying the footer content). Your code modifications could get removed whenever the theme is updated, so creating a child theme ensures your modifications remain in place when the parent theme is updated.
How to create a child theme?
A WordPress child theme requires two files at a minimum in order to be created – a stylesheet and a functions.php file.
Step 1: Create a theme folder
Before you can create a child theme, you’ll need to create a folder in the wp-content/themes directory of your website. If you do not have FTP or cPanel access to your website host, I recommend using the WordPress plugin Filester – File Manager Pro. Using Filester, you can upload, edit and remove files in you WordPress directory from your WordPress admin panel.
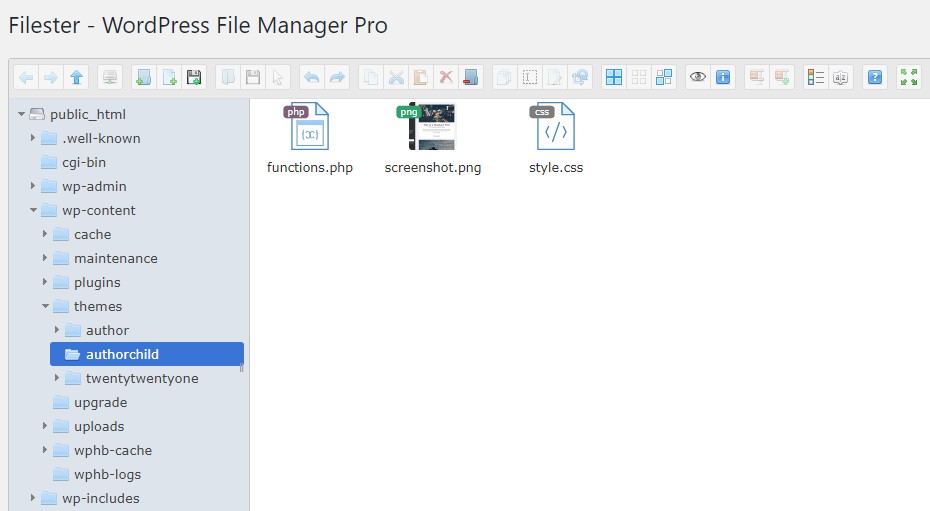
The name of the folder must be unique and should represent the name of your new child theme. Do not use any spaces or special characters in the folder name. Using Filester, I have created a folder called “authorchild” in wp-content/themes. This folder will contain all files created for my new child theme, a child theme of the Author theme for WordPress.
Step 2: Create the style.css file
Using Notepad or your text editor of choice, copy and paste the following into a new document:
/*
Theme Name:  My Child Theme. Child of Twenty Nineteen.
Theme URI:  https://justinsinclairthomson.com
Description:  Theme for making changes to default theme. Child theme of Twenty Nineteen.
Author:  Justin Sinclair Thomson
Textdomain:  jsthomson
Author URI:  https://justinsinclairthomson.com/
Template:  twentynineteen
Version:  1.0
License:  GNU General Public License v2 or later
License URI: https://www.gnu.org/licenses/gpl-2.0.html
*/
You will want to modify the contents to adjust it to your own theme and author details. Pay careful attention to the “Template” line, as this is the most important line in this code. The “Template” line must specify the folder name of the parent theme, exactly as it is written in the /wp-content/ directory. In the case of the example above, a child theme is being created from the Twenty Nineteen theme, which exists is in the /wp-content/twentyninteen/ directory.
Save the file as “style.css” and upload it to the child theme folder created in step 1.
Step 3: Create the functions.php file
After creating the style.css file in your text editor of choice, the next step is to create the functions.php file. Create a new blank file in your text editor and paste in the following:
<?php
/* enqueue script for parent theme stylesheet */
function childtheme_parent_styles() {

 // enqueue style
 wp_enqueue_style( 'parent', get_template_directory_uri().'/style.css' );
}
add_action( 'wp_enqueue_scripts', 'childtheme_parent_styles');
This function will enqueue the stylesheet from the parent theme, making the parent theme’s CSS styling available to the child theme. Without this functions.php file, your child theme would not have any stylesheets applied to it.
Save the file as “functions.php”, and upload the file to your child theme directory – the same directory you created in step 1, and uploaded your style.css file to in step 2.
Step 4: Add a theme screenshot image (optional)
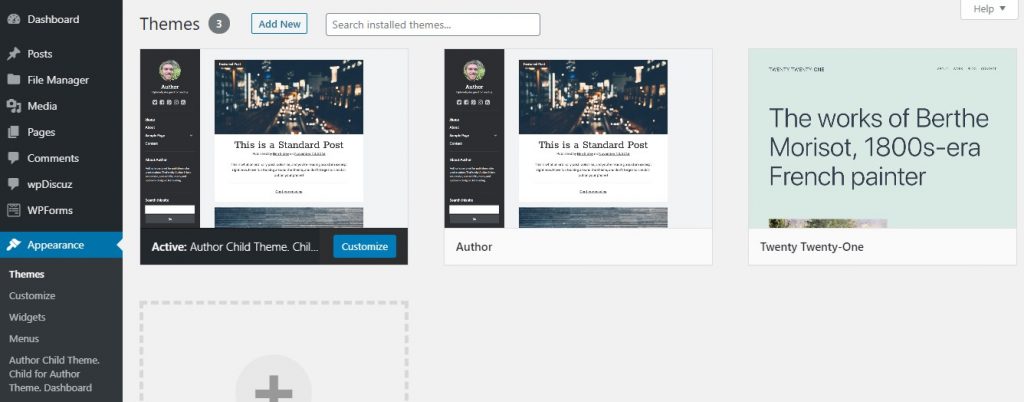
As an optional step, you can add a screenshot file that will be displayed with your theme when you view it under Appearance -> Themes in your WordPress admin panel.
Using FTP, cPanel, or Filester if you do not have server access, navigate to the parent theme’s directory and locate the file called “screenshot.png”. Copy this file into the folder for your child theme. You could update this file or create a new .png file using the same filename and dimensions if you want to give your child theme a unique image.
At this point, you should now have three files inside your child theme folder:

Step 5: Activate your WordPress child theme
With your core theme files uploaded, you are now ready to activate your new child theme. In your WordPress panel, navigate to Appearance -> Themes. You should now see your child theme available as one of the installed themes on your website. If you added the screenshot.png file in step 4, you will see the screenshot image along with your child theme’s name.
Hover over your new child theme and click on “Activate” to activate it. If you are using any caching plugins such as Hummingbird, Autoptimize or W3 Total Cache, you should clear your page cache and browser cache at this point.

Now go visit your website in a new browser window. It should look exactly how it looked previously. This is good – that means your newly activated child theme is using all the files from the parent theme, as you have not yet added any new stylesheets or functions to your child theme.
Once you’ve confirmed your child theme is inheriting the styling from the parent theme, you can now proceed to customize your new child theme, without needing to make any changes to the parent theme’s code. Any new styling or functions that you apply to your child theme will override those inherited from the parent theme.
Found this article useful? Let me know in the comments below.

Be First to Comment